Edward S. Curtis – Short Nights of a Shadow Catcher

A reader has brought to my attention a new biography of photographer Edward S. Curtis, who over the course of thirty years in the early twentieth century, documented native American populations.  I am certainly going to read this book by Timothy Egan; so I reserve judgment on that.  But reading the review in the New York Times, reintroduced me to the photographs of Curtis and that is always a welcome experience.
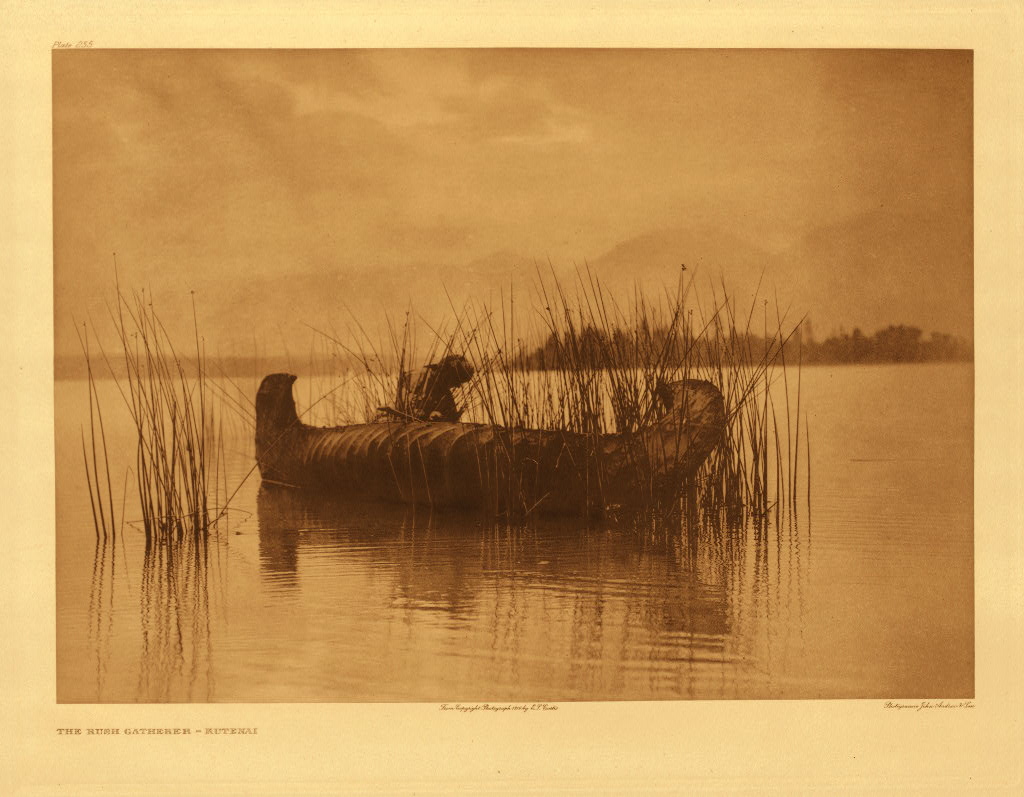
Figure 1 – One of Edward S. Curtis’ most popular images “Rush Gatherer, Kutenai, 1911” from the collection of the LOC.

The topic is a complex one.  We are confronted with the imperial age view of manifest destiny, the glorification of the American west, and the worship and emulation of the manly, personified by Theodore Roosevelt.  At the same time, Curtis was contemporaneous with Franz Boas, “the father of modern anthropology,” and the emergence of the concept of cultural relativism, itself a hugely complicated and controversial idea. The attempted eradication of native peoples and native cultures is a terrible blot on our moral credibility as a nation.  Curtis, with his concept of “the vanishing race,” believed that he was documenting the demise of the native peoples.  In reality he was documenting their transition into modern times.

Fortunately, our focus here is on the photographic, and Curtis was a grand master of the photographic image.  His work is monumental.  His goal was to document every Native American tribal group then in existence.  He filled twenty volumes with sensitive and beautifully crafted photographs.  As an ethnographic record it rivals, indeed eclipses, Roman Vishniac’s “A Vanished World,” which documents the end of Hebraic culture in Eastern Europe on the eve of World War II.

Curtis has been criticized for staging or posing many of his images, albeit to recreate well researched scenes.  It is important to recognize the limits of contemporary emulsions.  No less posed and staged were John Thomson’s equally significant photographs of nineteenth century London street life, published 1876-7 and taken under much less trying circumstances.  The role of photographer as a chronicler of visions that will never be seen again is both important and profound.
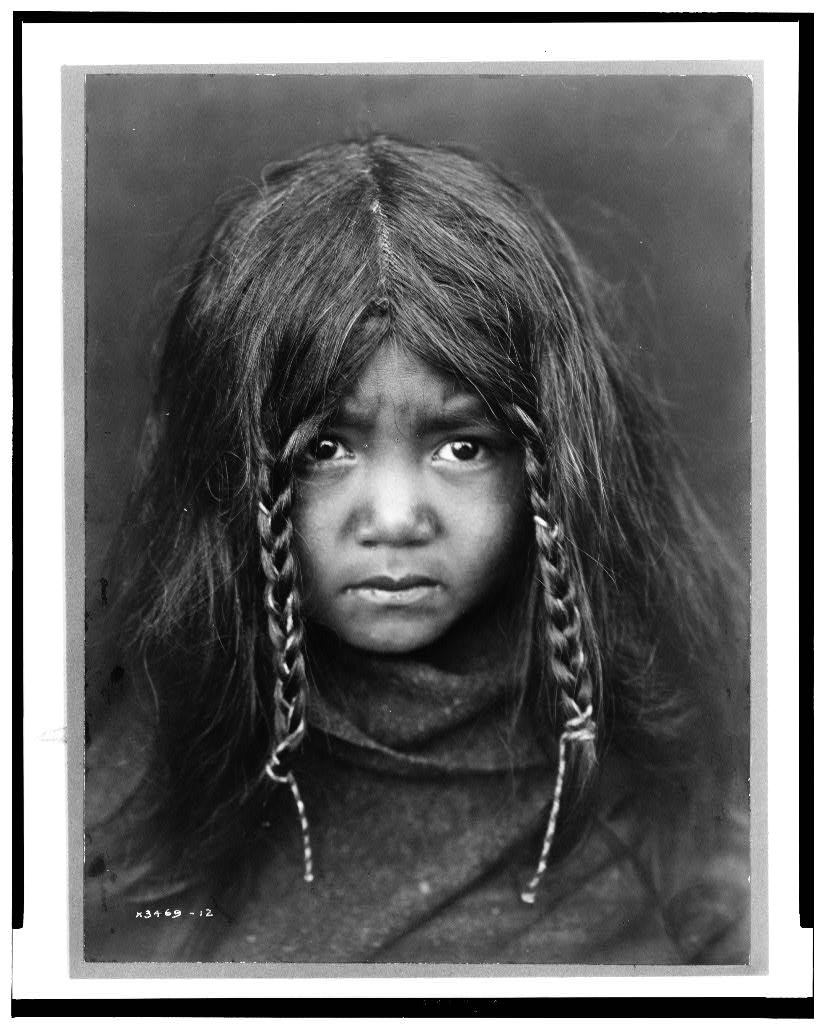
Figure 2 – Edward S. Curtis, “Quilcene Boy, 1913,” from the collection of the LOC.

I really had no understanding of just how prodigious Curtis’ output was, until I started researching this blog and visited the Library of Congress (LOC) and Northwestern University  pages dedicated to providing a resource for Curtis’ work.  There is also an excellent resource at the Edward S. Curtis Gallery, which offers many of these wonderful works for sale.  There are hundreds of beautiful images of people in portrait or posed in the course of their daily and spiritual lives, as well as images of their handiwork.  Always compelling are the beautiful images of children.  It invariably haunts me to see the flash and beauty in the eyes of children in images now a hundred years old.  The flash is there for eternity, while the individual is long gone.  Photography, more than any other form of portrait art, has this effect, and it is a tribute to Curtis’ impact that native Americans today use his photographs to teach the current generation of their children about their cultural heritage.
Alf Kumalo- Photo-chronicler of apartheid

I learned yesterday of the passing on October 21, 2012, of South African photojournalist Alf Kumalo.  Last week we spoke about an exhibit of Vietnam War era journalist photographs. Two images in particular stood out in my mind: Edie Adams’ “Brigadier General Nguyen Ngoc Loan Executing the Viet Cong Guerilla, Bay Lop, 1968” and Nick Ut’sChildren Fleeing South Vietnamese Air Force Napalm Attack on the Village of Trang Bang, 1972” These two pictures, arguably more than any others turned American sentiment against the Vietnam War and ultimately ended it,  Alf Kumalo’s work had a similar effect on a generation of South Africans and contributed significantly to the end of apartheid. 

It has always amazed me how a photojournalist, when confronted by a horrific scene, can have the presence of mind to abstract him or herself, at least long enough to compose and take a photograph.  In this context, it is all the more significant that Kumalo, as a black African male, was himself subjected to the same harassment and beatings by authorities as his subjects.  He not only chronicled what he saw but lived it.

For a brief biography of his life I suggest visiting his obituary in the New York Times.  For those of you who would like to see print images, I suggest his photo-biography “Through my Lens.”  And finally in memoriam view Alf Kumalo’s works online, visit Axis Gallery.  We may reflect, that this is why photography matters.

Measuring camera resolution and sharpness – Part 3

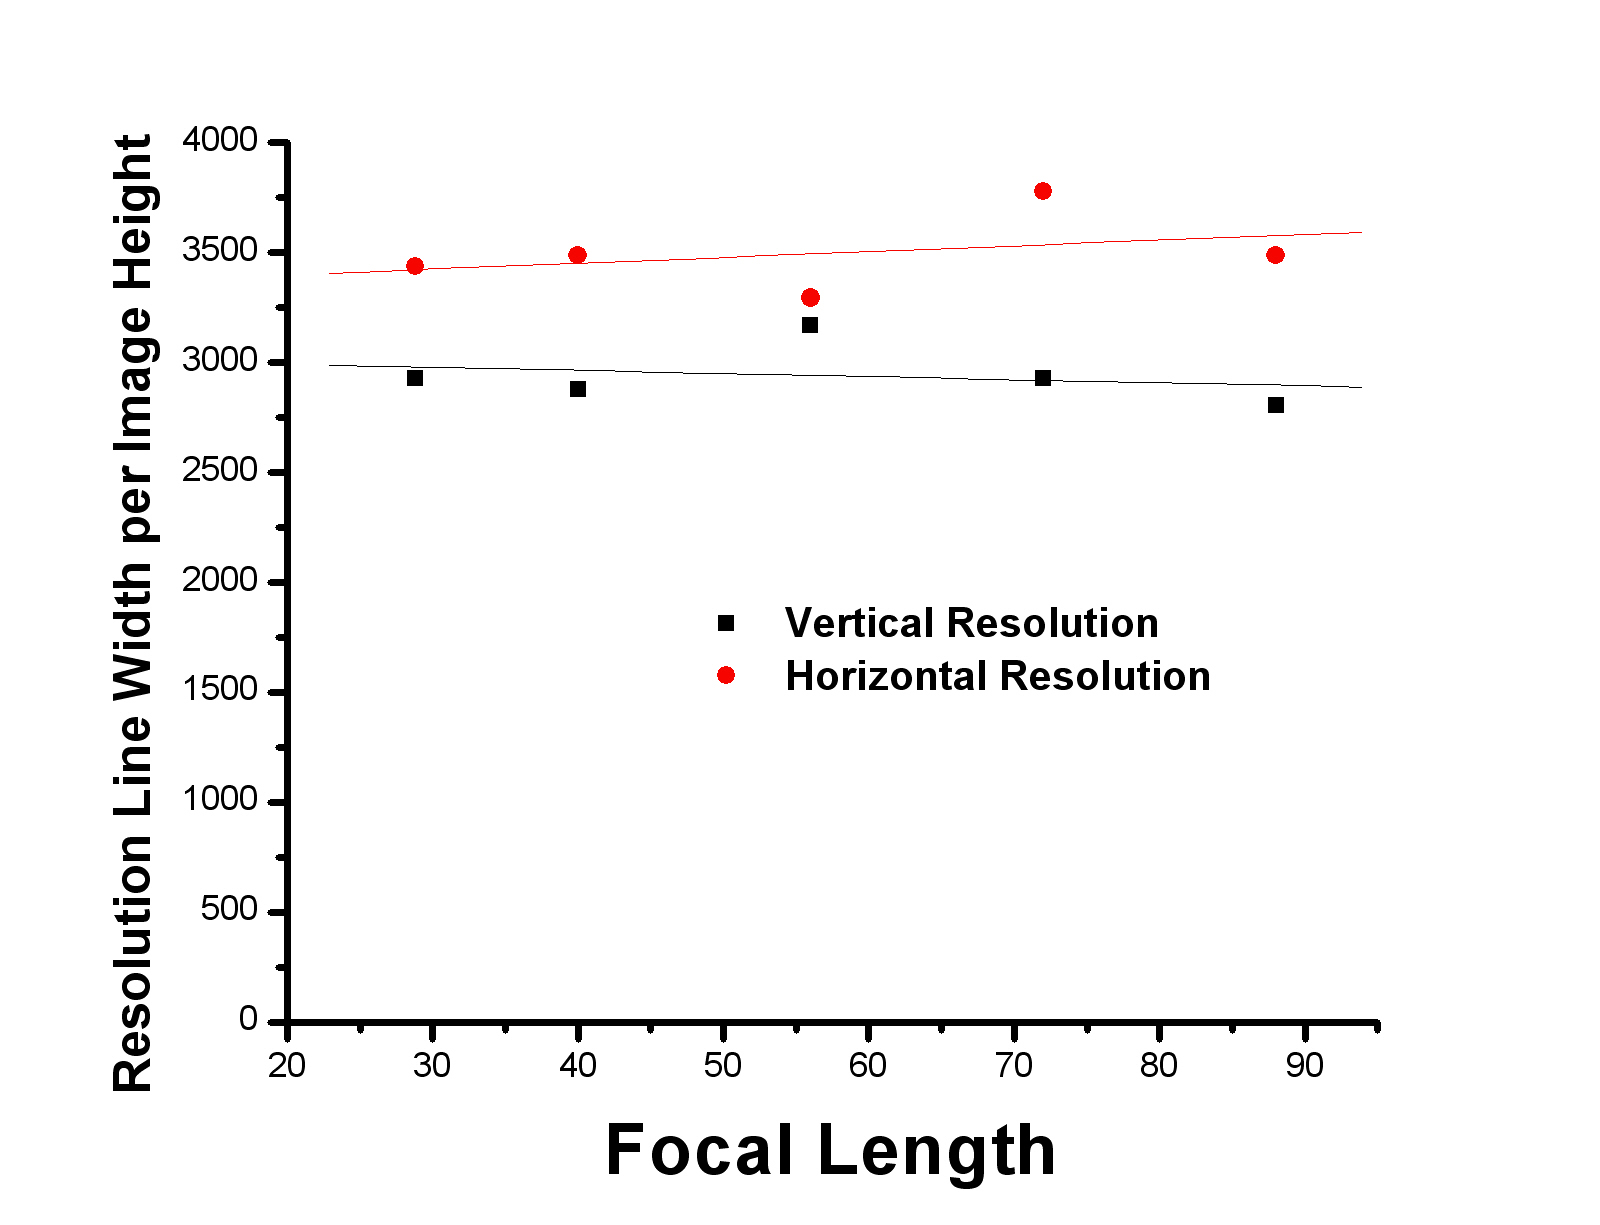
Figure 1 – horizontal and vertical resolution of the Canon S 18-55 lens on the T2i shown as line widths per image height as a function of focal length

In the second part of our exploration of how to measure camera resolution, I presented data which showed that for my Canon S 18-55 lens measured on my Canon T2i at 18 mm (actually 29 mm because of the 1.6 multiplier due to the size of the sensor element) the resolution was very close to the 3456 value for pixel limited resolution.  This mean that this lens, using this criterion for sharpness, is performing about as best as it could.

So let’s call this an example of a good lens and ask how it performs over a series of focal lengths.  That is we ask whether resolution is perserved as the lens is zoomed in.  We perform the measurement as before only holding the f-number at 7.1 and progressively moving further and further away from the target.  For each focal length we just fill the image as before.

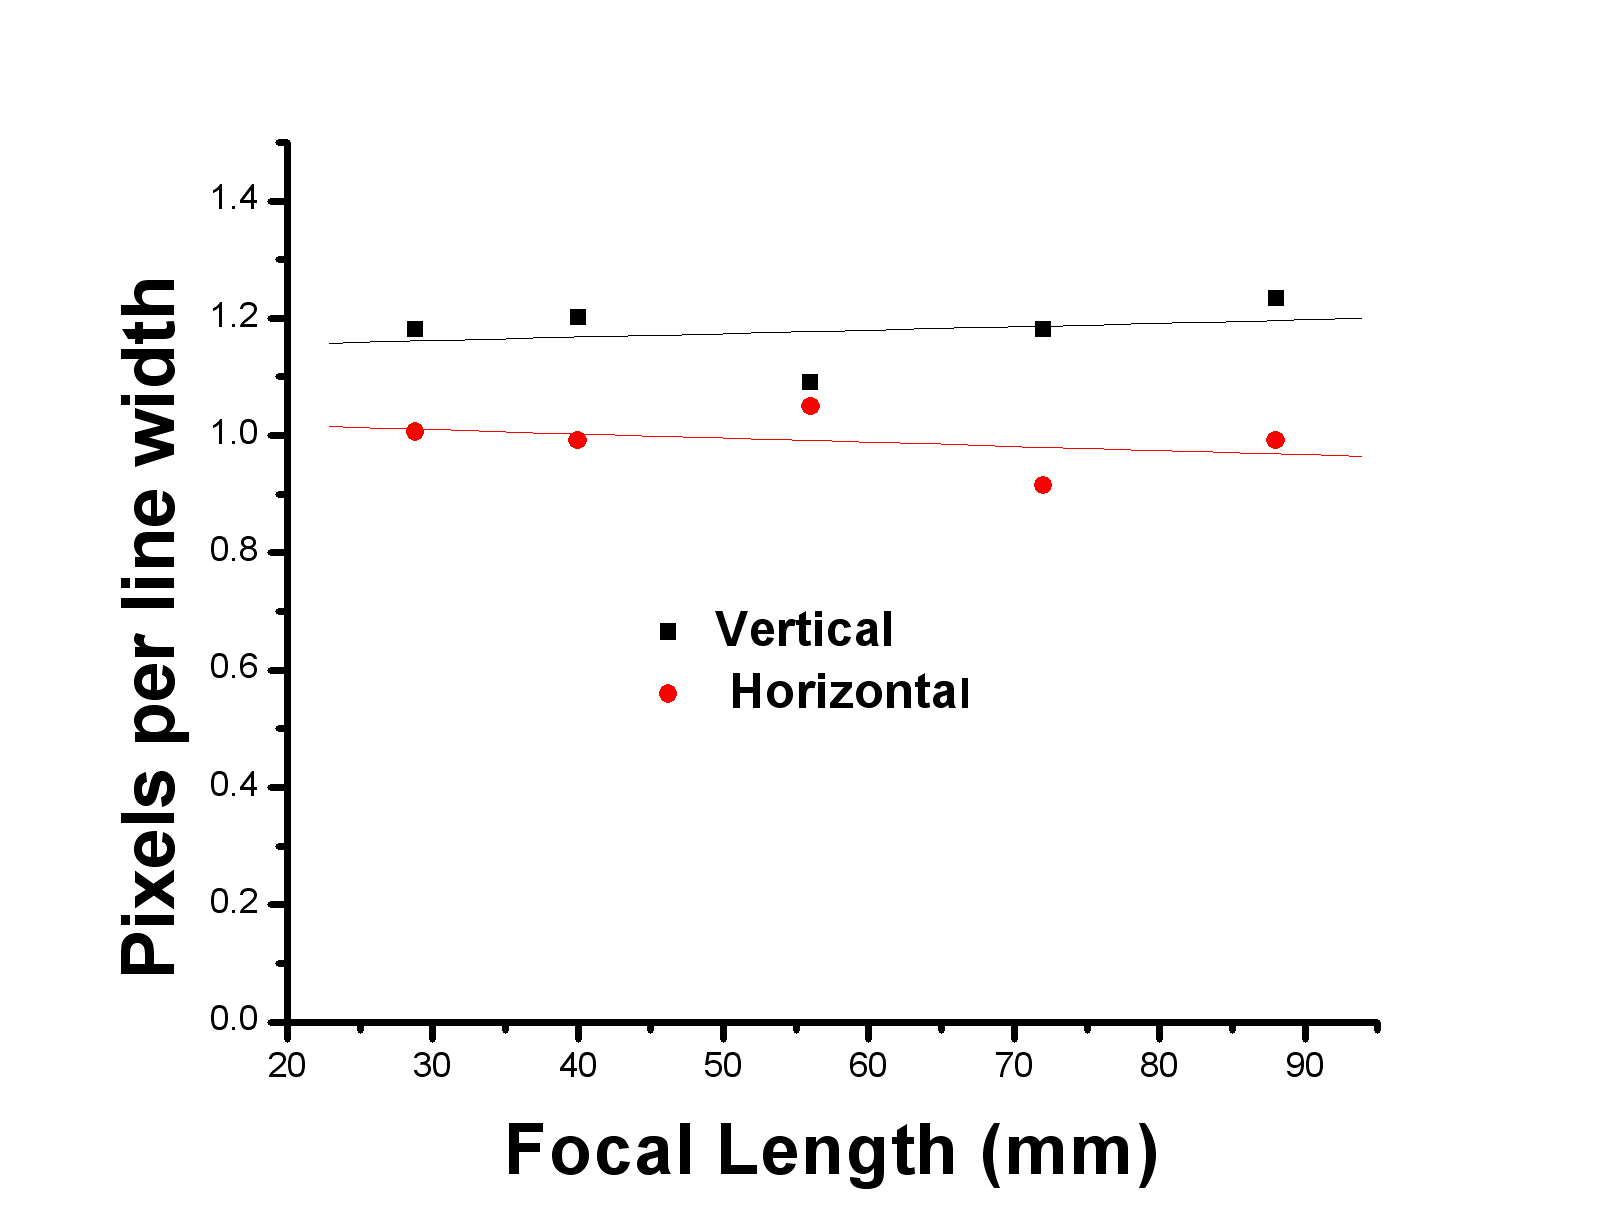
Figure 2 – horizontal and vertical resolution of the Canon S 18-55 lens on the T2i shown as pixels per line width as a function of focal length

The results of such an experiment are shown in Figure 1, where we plot line widths per image height as a function of focal length.  We observe a very flat response.  In all cases the resolution is close to the pixel limites value of 3456.

In fact, it might be more userful to consider the graph of Figure 2, where I plot the pixels per line width as a function of focal length.  For both horizontal and vertical resolution, this value is very close to the theoretical limit of 1.0.

Now that we have an example of good lens performance we are in a position to look at “bad lensed” and to examine how other factors and settings affect image resolution and sharpness.

Edward Weston – Murder in the Cathedral

I decided that it would be interesting to assemble a set of “My Favorite Photographs.” Perhaps I will share some of these with you.  When you test your memory with the question: which photographs of all the thousands that you have seen rise to, say, the top twelve favorites,   your mind organizes itself and first asks: who are your favorite photographers.  That seems an easy question.  In my youth two photographers inhabited the Cathedral of the Most Holy.  These were Ansel Adam and Edward Weston.

These two sainted figures set the standard for what could be done with black and white photography.  That is, if you were willing to, like a novice or initiate, learn the black and white arts of the fine print.  It is a standard to which I, and my generation of amateur phoyographers, continue to strive.  So then the problem becomes simple.  For Ansel Adams, it’s “Moonrise Hernandez, NM, 1941” and for Weston it’s “Pepper No. 30., 1930

Please take a moments and follow the link to have a look at “Pepper No. 30.”  It is a very sensual pepper.  The two halves seem to be caressing one another as two lovers.  It’s a wonderful picture.  So I clipped it out electronically and pasted it into my little collection of favorites.  This is when it struck me.  I still like it, and Edward Weston is certainly still one of my top favorites.  But Pepper No. 30 no longer holds special favorite status magic for me.  It was a revelation for me.

I found myself rushing to my bookshelf and dusting off the little 1971 Aperture monograph “Edward Weston.”  Relieved, I found that I still love Weston.  His “Nude in the Dunes, 1930,” his curled up “Nude, 1936,” and his “Two Shells, 1927,” still ring true and wonderful.  But “Pepper No. 30,” not so much!  It made me wonder what had happened, why had this image lost its spell on me?

I looked up in the Aperture monograph what Weston himself wrote about “Pepper No. 30.”

“It is classic, completely satisfying, – a pepper – but more than a pepper: an abstract, in that it is completely outside subject matter.  It has no psychological attributes, no human emotions are aroused: this new pepper takes me beyond the world we know in the conscious mind.”

Really?  It was then that I understood.  It is not that the pepper was any less sensuous or abstract.  Like any original, its impact had become lost when copying became overwrought.  “Pepper No. 30,” and equally wonderful, “Cabbage Leaf, 1931,” have been copied so much that we have become immune to their impact.  Indeed, I’ve probably seen “Pepper No. 30” reproduced over a thousand times. The entire kitchen: carrots, turnips, cabbages, and pasta have been imaged so many times that we no longer care.  Even in film we have the famous gastronomical seduction in Tony Richardson’s screen adaptation of Henry Fielding’s, “Tom Jones,” and Ken Russel’s rendering of D. H. Lawrence’s essay on “The Proper Way to Eat a Fig in Society,” in his “Women in Love.”  This marvelous little photograph that I once revered and held in sainted status had been murdered in the cathedral.

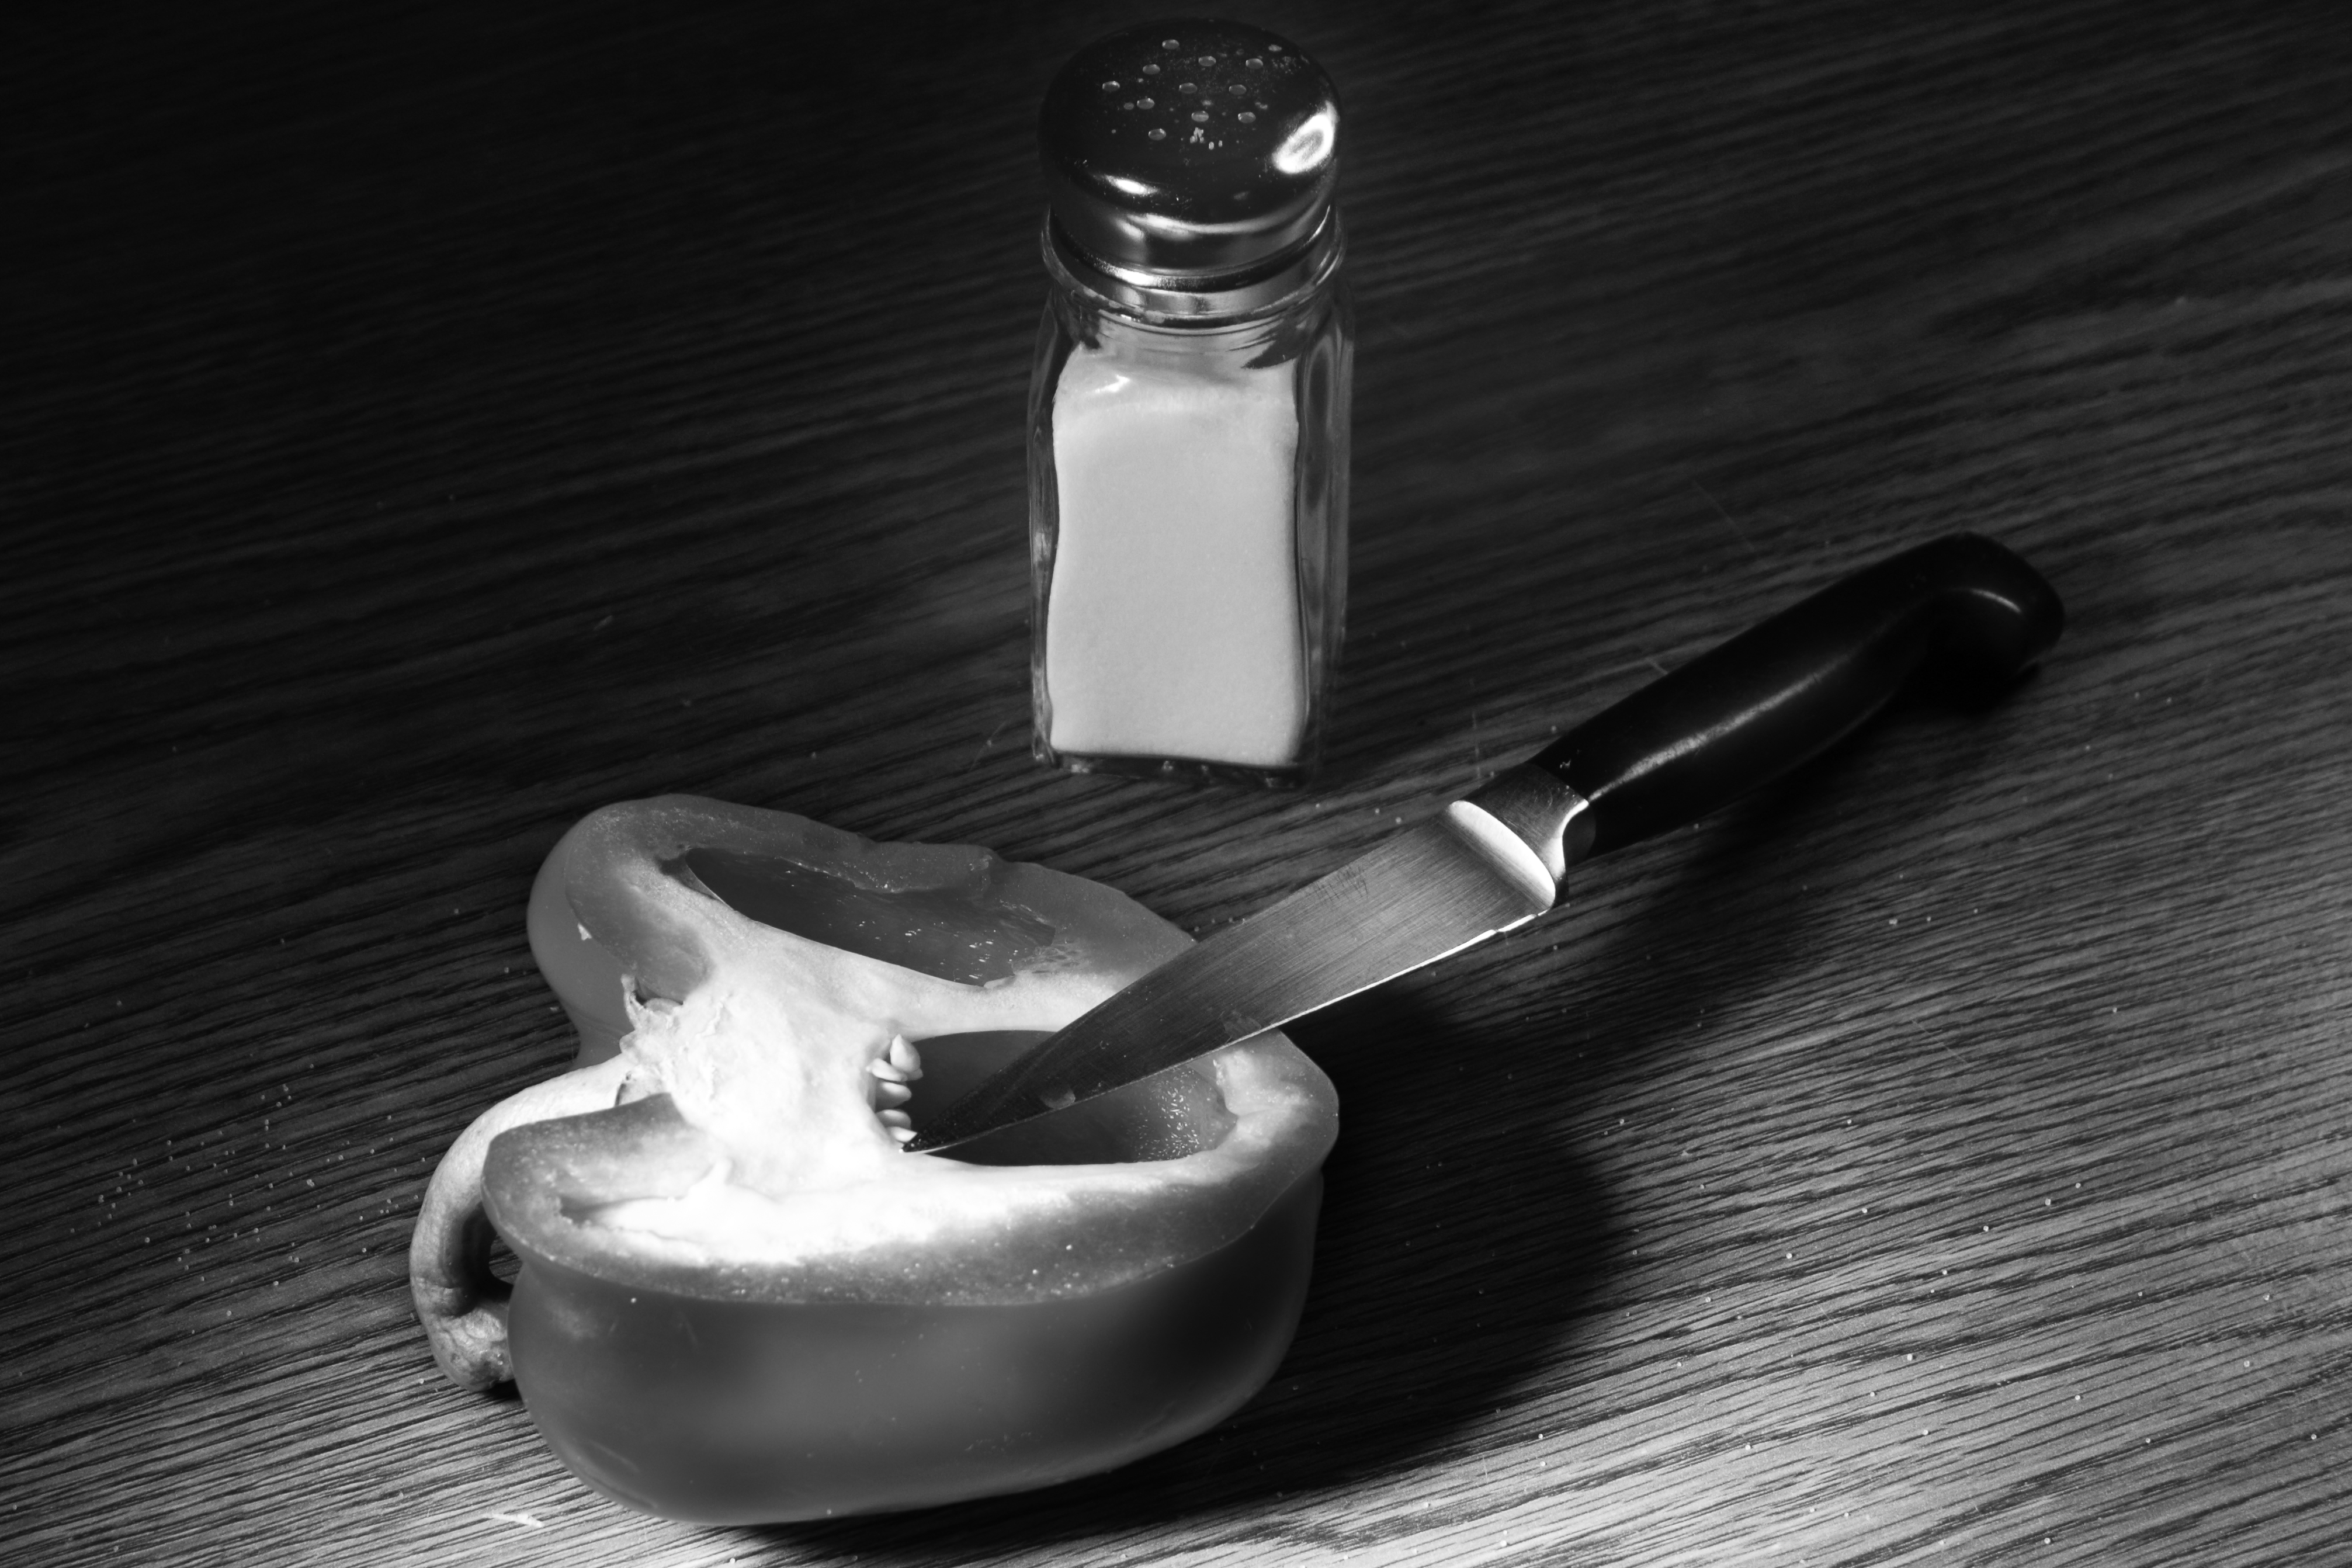
Figure 1 – Murder in the Cathedral, Copyright D. E. Wolf, 2012

Weston describes how the pepper was beginning to lose its freshness, that this was the last day that it would be worth photographing.  So I suppose we must assume that it was ultimately eaten.  For me, I am pleased that I opened the monograph.  Sometimes there is a special intimacy to looking at photographs on paper, and I find that Edward Weston still occupies the pantheon of my personal greats.  Looking at his images, I realize how much there is to learn and how much he has to teach us.

Kennedy to Kent State: Images of a Generation

I’d like to recommend a new exhibit “Kennedy to Kent State: Images of a Generation,” at the Worcester Art Museum, in Worcester, MA.  For those of you who have never been there, this museum with its top-notch cafe’, as well as the nearby American Antiquarian Society, are jewels in central Massachusetts.  The exhibit is an extensive set of photojournalistic images collected by Howard G. Davis, III to chronicle the period from 1958 to 1985.Thus, we have the civil rights movement, the space race, the Kennedy assassination, the war in Vietnam, Kent State, the Beatles, and the Rolling Stones.

To those of us, who are of that generation, the images are not only iconic but haunting.  Revisiting pictures such a Eddie Adams’ “Brigadier General Nguyen Ngoc Loan Executing the Viet Cong Guerilla, Bay Lop, 1968;” Bernie Boston’s “Flower Power,1967;” and Nick Ut’s “Children Fleeing South Vietnamese Air Force Napalm Attack on the Village of Trang Bang, 1972,” is absolutely viseral. These images changed America, and you are taken back to the first time that you saw them.  They are burned into your mind forever.  Ut’s image was originally censored, not because of the horror it depicted, but because it showed full frontal nudity.  Entering one of the little video booths to see the newsclips is terrifying.  You feel like you are about to be transported back to that formative time.

Honestly, it is powerful stuff!


Annie Brigman and the photo-secession

Let us take a break from technical issues today and recognize that photography is ultimately about art.  The technical aspects are to be mastered like learning to paint.  Technical proficiency is a necessary step towards achieving a subjective vision of what is in front of the camera.

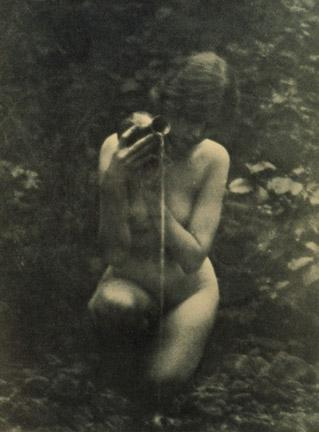
Figure 1 – Anne Brigman “The Source, 1909” From wikimedia.org

This is essentially the view of the photo-secessionist movement founded by Alfred Stieglitz and Holland Day in 1902.  Stieglitz and Day’s photo-secessionist group mirrored a British coterie, “The Ring,” that had seceded from “The Royal Photographic Society.”  This view that photography was about pictoralism,  not so much about accurate depiction as about manipulation of the image by the photographer to achieve his/her artistic goals was, at the time, highly radical.  And in that sense, it ushered in a new century in photography.

A quintessential member of this movement was California photographer Annie Brigman, who is famous for her nudes photographed in rustic settings, usually the Sierra Nevada.  She heavily reworked her negatives to achieve classic mythic imagery that often paralleled significant paintings.  I, personally, discovered Brigman at the RISD Museum “America In View” exhibit and, honestly, some of her works take my breath away.  They appeal to a deeply engrained sense of the spiritual.


Figure 2 – Photograph of Jean Auguste Dominique Ingres’ “The Source, 1856” in the Musée d’Orsay. From wikimedia.org

Anne Wardrope Nott Brigman was born in Honolulu in 1869.  In 1885 she moved to Los Gatos, CA.  In 1894, she married sea captain Martin Brigman and accompanied him on several journeys to the South Seas. Around 1900, she settled in San Francisco and became active in the Bohemian community. Stieglitz listed her as an official member of the secessionist movement in 1902.  Between 1903 and 1908 her photographs were featured in several issues of Stieglitz’s photo-secessionist journal “Camera Work.”  Brigman became a significant figure and highly revered in the community of California artists and photographers.  A major retrospective of her photographs and poetry, “Song of a Pagan,” was published in 1949 a year before her death.

Three of her works standout in my mind.  These are: “The Source,” first published in Camera Work in 1909;  “The Bubble,” also first published in Camera Work in 1909, and “Figure in Landscape, 1923.”

The source depicts a female nude pouring water on the ground from a clay urn.  Needless-to-say this evokes the mythic sense of the mother goddess, sanctifying the Earth, and the source of a great and nourishing ancient river, such as the Nile.  It is a classic image as evidenced by the similarly titled work by Jean Auguste Dominique Ingres in the Musée d’Orsay.

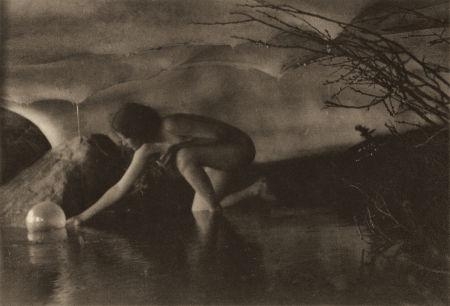
Figure 3 – Anne Brigman, “The Bubble, 1909,” from wikimedia.org

“The Bubble” is a fantastic image of a female nude, creating and launching a bubble on a mystic stream.  The references to the mother goddess again seem clear and engrained.  The bubble, which appears in several of Brigman’s works, evokes the ovum from which we are all born.  The river is not only the birth canal but the river of life on which we must all journey.

The Figure in Landscape” is something quite different. A female nude stands in the distance on a ledge above a lake.  She looks away from us, perhaps about to take the risk and dive into the water.  For me, this creates a sense of the possibilities of youth, heightened by the unspoiled purity of the American wilderness.  I have read that Brigman typically photographed herself or the rugged and self-assured young women that had the strength to live and thrive in the Sierra Nevada.  It is cliché now to say that the twentieth century was the American Century.  But in a sense this lone figure, like the photo-secession itself, seems to open and define that century.


Measuring the resolution of my IPhone

Of course, after measuring the resolution of my Canon T2i 18 MPz digital SLR, I thought that it would be fun to balance my IPhone 4S on the tripod and see what resolution it has.  Recognize that this is automatic focus and also has JPEG compression.  So this isn’t really an apples to apple comparison.  Still, I was curious how it would perform, since I am endlessly amazed at the ability of this little camera that is carried everywhere by millions.

The IPhone 4S has a remarkable camera.  It produces 8 M PZ (3264 X 2448) images on a 7.9 mm (on the diagonal) sensor.   This means ~ 2 um pixels. It has gyro-stabilization and a f/2.4 five element lens with an amazing autofocusing mechanism.  We really need to discuss some of this in greater detail.

For now, following the procedure described in the last two blogs, I found the resolution in the long axis to be 2466 line widths in the long axis and 2101 line widths along the short axis.  This is 1.3 pixels per line on the long axis and 1.2 pixels per line on the short axis. So we are again very close to the pixels limit on resolution.  So, bravo for Apple!  This is a very impressive little camera and hardly an after thought on a smart phone design.

Measuring camera resolution and sharpness – Part 2

Let’s continue our discussion of how to measure digital camera resolution.  Using the procedure described in yesterdays blog, I measured the horizontal and vertical resolution of my Canon T2i with the S 18-55 lens (not the IS variant) set at 18mm.  Multiplying by the 1.6 correction factor for the sensor size of 22.3 mm x 14.9 mm (5184 pixels x 3456 pixels) this is an effective focal length of 29 mm.  Note also that this means that the pixel size is 4.3 um on a side.

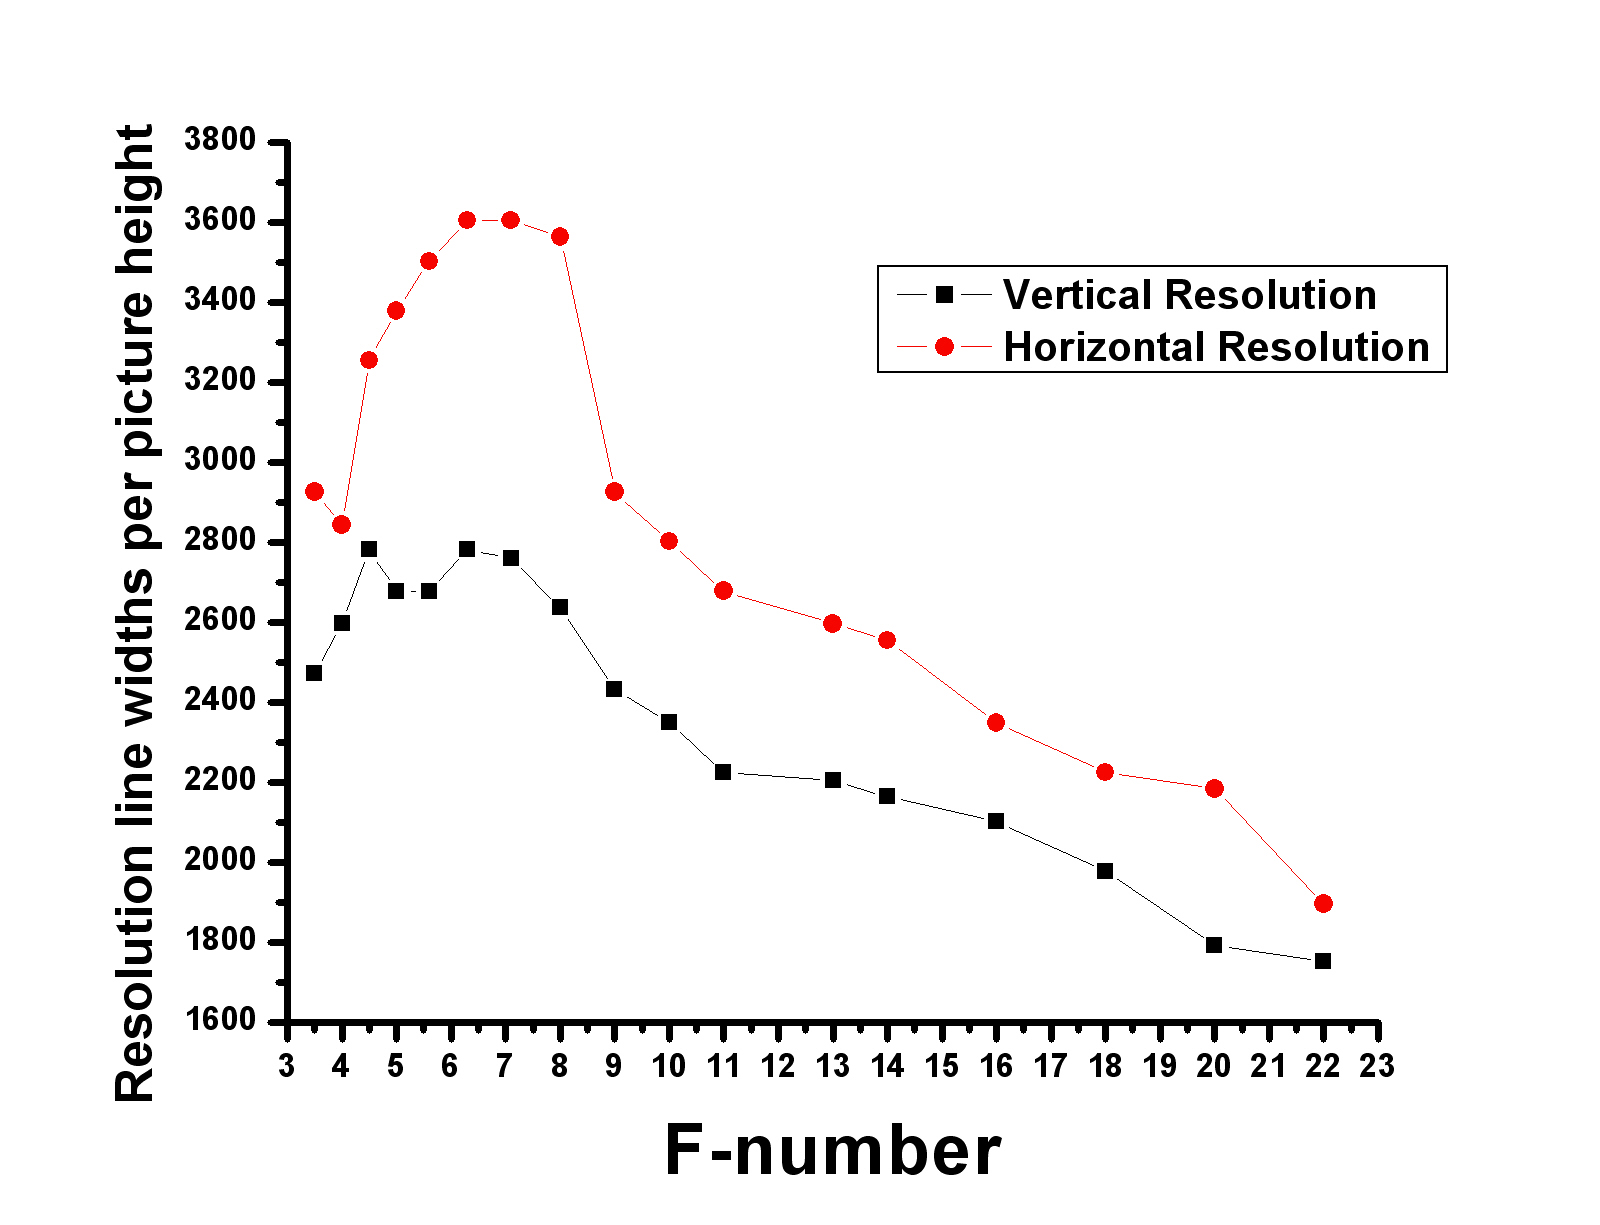
The data is shown in Figure 1.  We see three significant facts: 

  • With increasing f-number resolution rises at first and then falls.
  • The horizontal and vertical resolution are different
  • Horizon resolution maximizes at 2760 line widths per image height at ~ f-7.0
  • Vertical resolution maximizes at 3605 line widths per image height also at ~f-7.0

    Figure 1 – Horizontal and vertical resolution of a zoom lens at 29 mm zoom setting

What is the origin of the non-monotonic dependence of resolution on f-number?  We’ve actually discussed both factors previously.  In the blog on pinhole cameras, we saw how increasing f-number should increase image sharpness.  However, in the blog on Camera Resolution and the Airy disk, we saw how as f-number increases sharpness ultimately becomes diffraction limited by the dimensions of the Airy disk.  You can in fact use the simple relationship that the resolution = 1.22 X (wavelength of light) x f-number and ask when does this become equal to the pixel size of 4.3 um.  For green light (wavelength = 0.55 um) this occurs at ~ f-7.0.  Beyond that point, the diffraction spot from a point of light becomes greater than a pixel in dimension and the resolution ceases to be pixel limited and becomes diffraction limited instead.

 We can in fact calculate how many pixels wide is the diffraction spot in our test.  For instance for the horizontal data the image is 5184 lines wide, as defined by the pixel number, but only 3606 lines wide as defined by our measurement. This means a line is 1.4 pixels wide horizontally.  A similar calculation gives you 1.2 pixels wide vertically.

 All of this would appear to say that, at least at 29 mm zoom, this lens is performing very close to the pixel limit.  It also suggests that best-performance f-number of 7.0 is sensor rather than lens dependent.  This best-performance value is referred to as the DLA, for diffraction limited aperture, and matches the expected performance of the camera.

Measuring camera resolution and sharpness – Part 1

Following on our discussion of digital camera resolution, we are now in a position to actually make some measurements.  As we’ve already seen there are a number of ways to define resolution.  Following our earlier discussion of pixel limited resolution, let’s start with the question of how many line pairs (black and white) your camera can detect in the image height or width.  Another way to ask the same question is how many line widths are there in the image.  One line pair equals two line widths.  On my Canon T2i the sensor is 5184 X 3456 pixels.  So these are the maximum values for horizontal and vertical resolution defined in line widths.

I know that this sounds weird, and I puzzled over it myself for a long while.  But realize, what this definition of sharpness, in terms of line widths, means, is how well can your lens focus down a line.  The best it can do is one pixel.  But perfection is hard to achieve.  So our expectation is something more than a pixel.

Now there are a number of test targets that you can use.  My recommendation is that you go to Jack Yeazel’s website (there’s a lot of good information about resolution measurement at that site) and do one of two things: either print out the PIMA/ISO chart or follow the link to the Edmund Scientific site and buy one.  If you go the print out route, you need to go to PhotoShop and print out the high resolution chart and use a high resolution printer.  You can examine the resolution limit of your printed target using a magnifier.  Spending the $150 for a professionally made target may be starting to sound better about now. But, I have found that printing it out works just as well.

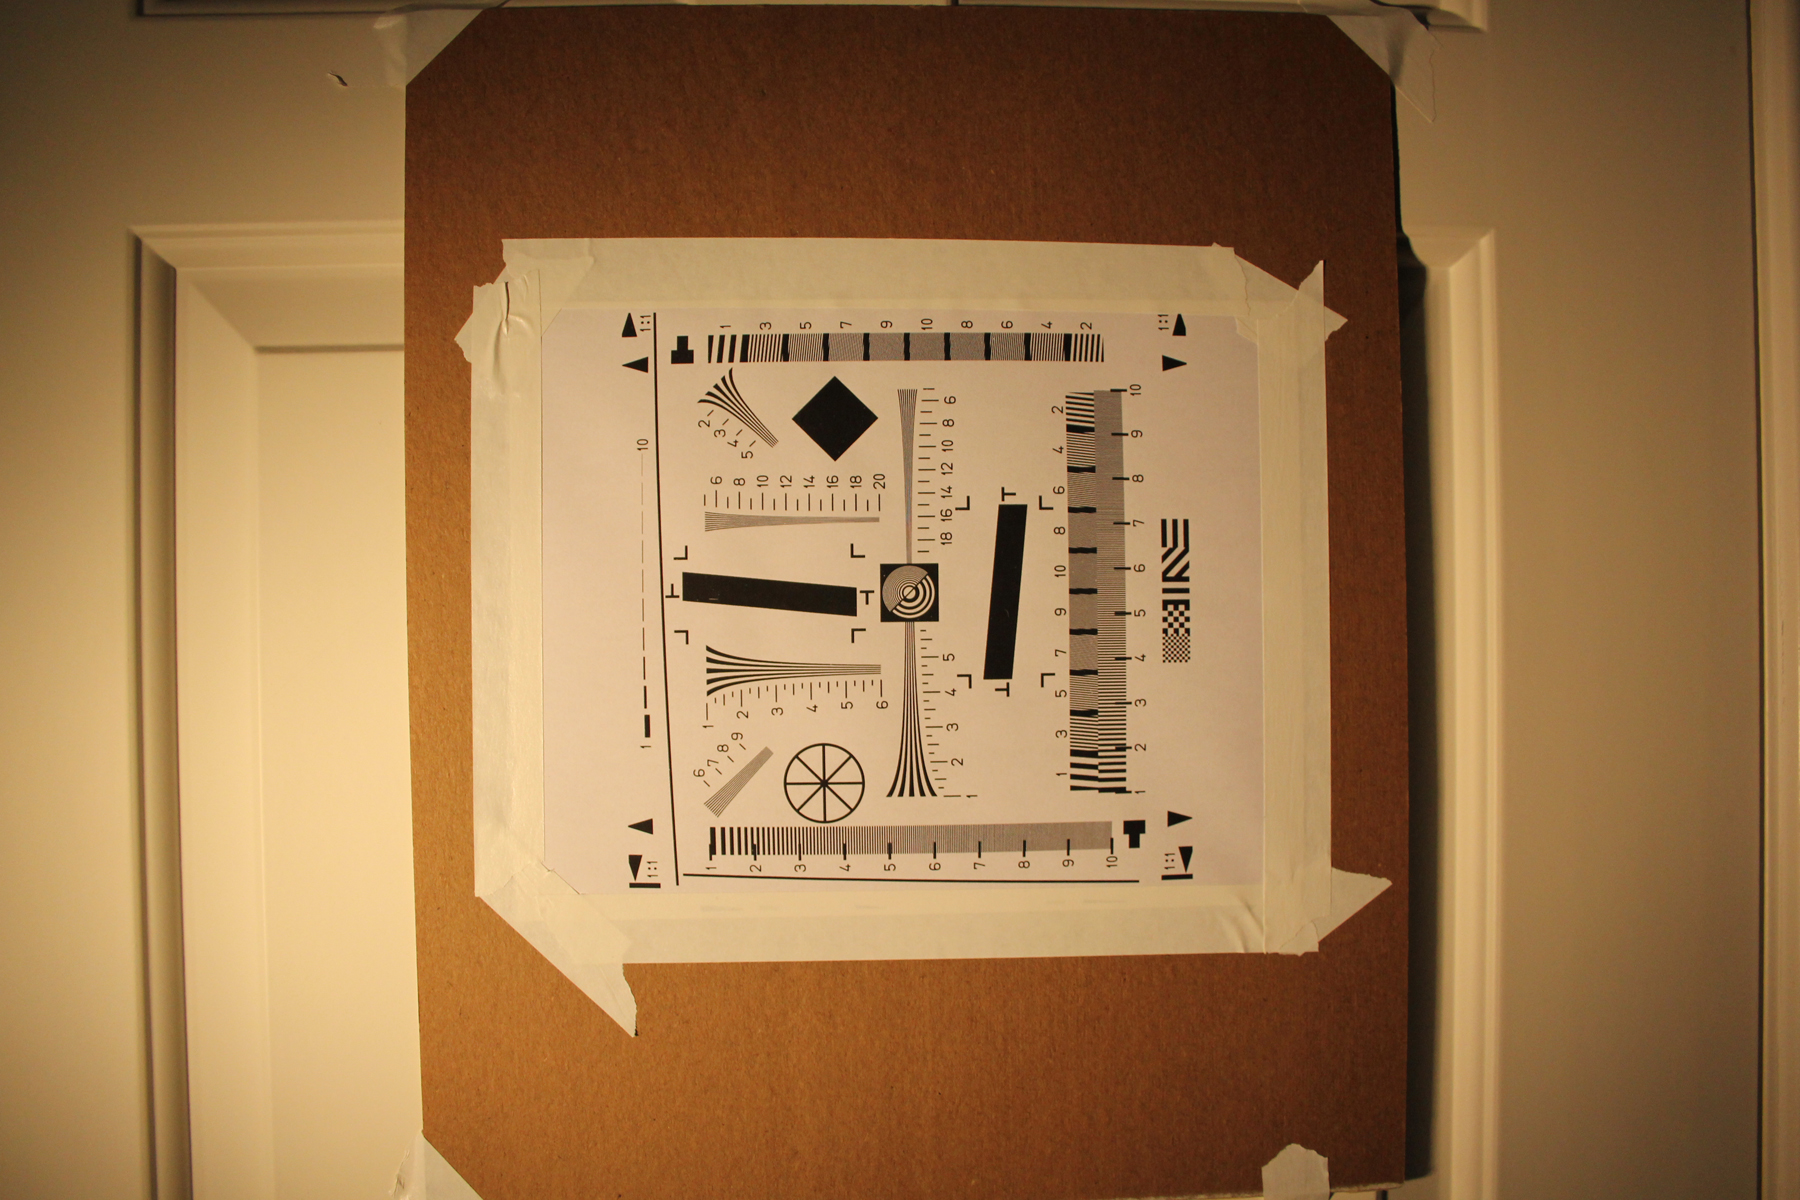
Figure 1 – The PIMA/ISO resolution target mounted on a 400 mm board to enable determining the resolution of a digital camera

Next modern digital cameras exceed the resolution of the PIMA/ISO target if you use it as originally directed.   So what you need to do, as shown in Figure 1, is to mount it on a larger board.  In my case, I mounted it on a 17 ‘ X 14 “ board.  Note the big arrows in the corners of the target.  These are 200 mm apart.  The height of the board is just over 400 mm, actually 412 mm.  Note next the nine lines that narrow horizontally and vertically.  Here’s a paradox.  The horizontal lines determine the resolution vertically and the vertical lines horizontally.  What you do is simple.  Place the camera on a tripod.  Did I mention that the camera must be mounted on a tripod, or else your resolution will be defined by handshake.  Set your camera to take raw unsharpened images.  You can use unsharpened JPEG images, but as you will see in a later blog, this can kill your resolution.  Set the camera distance such that the board just fills the screen. Then focus manually as carefully as you can.  Blow up the image on your computer (zoom in) and determine at what value you can just distinguish the lines.  Figure 2 is meant to show you this.  Whether it will or not it does depends on the resolution of your computer monitor.  So hopefullym you can see it and get the idea.

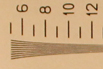
Figure 2 – Reading the vertical resolution using the PIMA/ISO target

In the Figure 2, you, again hopefully, can see that this “just see” point falls at about 7.0.  You then multiply by 200 and that gives you 1400 line widths per picture height.  The original PIMA/ISO chart was meant to be read so that it just filled the screen and multiplied by 100.  Where does 200 come from?  Because we doubled the size of the target, this should now be twice as big or 200.  My 412 mm actually makes this 206. In the next blog, we will examine a real lens using this protocol and determine how close to being pixel limited the resolution is.

This fairly straight forward procedure enables you to make a fairly sophisticated.  You are freed from being victim to such statements, found in lens reviews, like “It’s very very sharp.”  In the next technical blog we will use this procedure to evaluate the resolution of a real lens and see how it depends upon f-number.