Bromoil printing

Figure 1 - Emile Joachim Constant Puyo, Montmartre, ca. 1906.  This is one of the images featured in the MFA exhibit on Pictorialism.  This image is from the Wikimediacommons and from the Metropolitan Museum of Art in NYC.  In the public domain in the United States because it is more than 75 yrs. old.

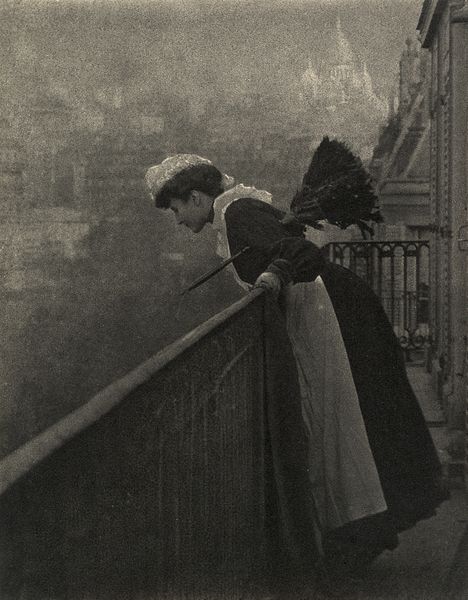
Figure 1 – Emile Joachim Constant Puyo, Montmartre, ca. 1906. This is one of the images featured in the MFA exhibit on Pictorialism. This image is from the Wikimediacommons and from the Metropolitan Museum of Art in NYC. In the public domain in the United States because it is more than 75 yrs. old.  Note the painterly quality of the image.  Is it a painting or is it a photograph.  This is the effect that the pictorialists were after.


Yesterday I discussed photographic Pictorialism and I got interested in what exactly their bromoil process entailed.  There is a lot of information about it to be found on the web, both at the Wikipedia site and, if you want to try it for yourself at the Alternative Photography site. We have previously discussed the world’s first photograph and this is a good place to begin considering the bromoil process.

For his first successful photograph Niépce, in 1826, used a pewter plate as a support medium that he covered with bitumen of Judea (an asphalt derivative of petroleum).  He exposed the plate for approximately eight hours. The exposed regions of the plate became hardened by the light, much like dentists currently cure cements with UV light.  Niépce removed the plate and used a mixture of oil of lavender and white petroleum to dissolved away the the unhardened bitumen.  This produced a direct positive image on the pewter, which has now lasted close to two hundred years.  Pretty cool, I think! And you will note oil-based.

In a more modern “oil print” the paper is covered with a thick gelatin layer photosensitized with dichromate salts. You layer a conventional negative above this sensitized paper and expose to light.  This is referred to as “making a contact print.”  The light exposed regions like in Niépce’s image become hardened. After exposure the paper is washed in water.  The less exposed non-hardened regions absorb more water than the higher exposed hardened regions.  You then remove excess water with a sponge and while the paper is still damp parts, you apply an oil-based lithographers ink.  Oil and water don’t mix, and as a result the ink preferentially sticks to the hardened regions thus creating a positive image.

The “bromoil print” is a variation of the oil print.  Here one starts with a normal silver bromide print on photographic paper.  This is then chemically bleached and hardened. The gelatin which originally had the darkest tones, is hardened the most.  The highlights will absorb more water.  Finally, you ink this print as you did in the “oil print.”

The first point is obvious.  This process requires a lot of skill.  But corollary to that you wind up with an enormous level of artist control over the process, once you have mastered it.  I also find intriguing how akin this process is to the printing process of lithography.  In bromoil printing the photographer essential releases him/herself from the bonds of the silver gelatin process and gains a delicate and moody control of the art, which is precisely the effect that the pictorialists sought.


Digitizing 35 mm slides


Figure 1 - Using a slide projector to digitize slides.  Insert top right shows slide projected on screen.  Method proved to be unsatisfactory because of the projector's lens quality. (c) DE Wolf 2013.

Figure 1 – Using a slide projector to digitize slides. Insert top right shows slide projected on screen. Method proved to be unsatisfactory because of the projector’s lens quality. (c) DE Wolf 2013.

I am a little perplexed, but I was doing some housekeeping on Hati and Skoll and discovered this blog that was meant to post on May 5 of last year, never did.  The world went on.  However, it covers what I think is a relatively important technical topic; so I thought that I would correct the error and post it today.

Recently, I decided to digitize my fairly voluminous collection of 35 mm slides.  This is not a trivial undertaking, but it does serve a couple of fun purposes.  First, you get to revisit all those “Kodak moments,” and second all the manipulations and subtle modifications that you wanted to do but couldn’t are no at your fingertips.

Actually, this last point is interesting.  In the glory days of film, you had three choices: take slides, where once you mastered the medium, what you took was what you got; take color prints, where what you got was invariably washed out by the commercial lab’s print machine’s compulsion to set overall intensity to neutral gray;  do your own color work, which was a truly daunting task, because of the level of temperature control required. This is not to mention expense. This all sounds like whining, but is pretty much true.

So, I went to the closet and unearthed the hundred of slides that I have squirreled away there and sorted them out into three not so neat piles: rejects, maybes, and definites.  So far so good.  Now I had to figure out out how to digitize them.  1. flatbed scanner? – don’t even think about it. 2.   Have a service do it for you? – I’ve had bad experiences with this, but obviously it’s going to depend on the service and their equipment. 3. – get a slide copier? – I’ve not been happy with the sharpness this provides, but others have had success. 4. Get a slide copying attachment that screws into the from of a camera lens? – I’ve read such bad reviews of this approach that I decide that even at ~$40  it wasn’t worth the effort. 5. Put the slides in a slide trade.  Put the slide tray in a projector. Project the slides on a sheet of paper, and take digital images.  6. Put the slides one by one on a viewing box and copy them with some kind of closeup lens system.

Figure 2 - Using a clos-up lens and opalescent light box to digitize slides. (c) DE Wolf 2013.

Figure 2 – Using a close-up lens and opalescent light box to digitize slides. (c) DE Wolf 2013.

The first method that I tried is number 5, and I have an picture of my setup in Figure 1.  Basically, you’ve got a slide projector, which tips the image slight vertically and then the camera behind the projector with a compensating tilt.  This would be so great and convenient, if it worked.  The problem is that the projector lens is the rate limiting factor.  I chose a Leica Slide Projector in the hopes that the lens would be up to the job.  And bottom line there is nothing that I hate more than a fuzzy picture. REJECT!

So then I setup the system shown in Figure 2, which is method 6 above.  Since it works well let me explain it in detail.

  1. Slide is copiously clean with compressed air.
  2. Slide is placed emulsion side up (that’s the duller side) on an opalescence (untextured) light box.  Again the box is tilted and the camera has a compensating tilt so that it is perpendicular to the light box. You can also obviously use a copying stand, or use a piece of opalescent plastic taped to a window.  Note the black paper jig that I built to mask out excess light and hold the slide in place.  This way you will get the exposure right and also there will be no glare in the image.  It is important to position the slide so bottom is bottom and top is top, that is so that the subject looks right.
  3. I am using a zoom lens at 100 mm focal length, with manual focus, and there is a closeup extension tube on the camera body.  I had some interesting problems with this.  First, my Tamron zoom lens was not up to the job of getting a crisp image.  It never is.  I then tried my Canon EFS 18-55 mm zoom and found that it would not work with my extension tube.  the electrical connection wouldn’t work.  I then resorted to my Canon L Series 70 to 200 mm zoom.  This worked beautifully, with the one exception that the ideal is to totally fill the field of view with the image.  I had to settle for only half filling the field of view.  However, my Canon T2i offered enough pixels that this was not a serious drawback (as you will see).  I set the f-number to 7.0, because as we have shown previously this is approximately where maximum sharpness is achieved on a flat subject.  I shot at 100 ISO and adjusted the exposure compensation according to the detail on each slide.  (Yes, this is a lot of work.  But it is worth the effort).  I always take raw image format. FOCUS VERY CAREFULLY!
  4. Next take the picture, making sure that things look right in terms of the focus and the dynamic range.
  5. Convert the image to a TIF file.
  6. Next in your image processor you NEED TO FLIP THE IMAGE HORIZONTALLY.  That is you need to make a mirror image.
  7. Then crop the picture to get rid of any images of cardboard.
  8. Then adjust the levels to set a reasonable white, black, and gamma.
  9. You are now ready to make any additional adjustments.  One important point is sharpening.  I tend to use Smart Sharpen for Lens Blur in Adobe Photoshop.  I usually sharpen between 4.0 and 8.0 pixels (depending upon the subject) with an average of about 6.0.  If you need to sharpen more, you’ve got a lens or focusing problem.

As an example, Figure 3 shows and image that I took of the San Francisco skyline from the Sausilto Ferry in 1975.

Figure 3 - "San Francisco from the Sausilito Ferry, 1975," Digitized 35 mm Kodachrome Transparency." (c) DE Wolf 2013.

Figure 3 – “San Francisco from the Sausilito Ferry, 1975,” Digitized 35 mm Kodachrome Transparency.” (c) DE Wolf 2013.


Camera Optics – the single lens reflex (SLR)

Figure 1 - Cross-section of a modern SLR camera. Image from the Wikipedia and created by CBurnett, in the public domain under creative commons attribution license.

Figure 1 – Cross-section view of SLR system: 1: Front-mount lens (four-element Tessar design) 2: Reflex mirror at 45-degree angle 3: Focal plane shutter 4: Film or sensor 5: Focusing screen 6: Condenser lens 7: Optical glass pentaprism (or pentamirror) 8: Eyepiece (can have diopter correction ability). From the Wikipedia and created by CBurnett, in the public domain under creative commons attribution license.

I’d like to return today to our technical discussion of camera optics.  We have looked at what mirrors do to light and at what lens do to light.  Based on what we learned so far take a look at Figure 1 which shows the innards of a single lens reflex or SLR camera.  The first object that we see is the lens.  The lens is actually a composite of multiple lenses.  However, we know that the lens is going to invert the object on the sensor or film.  Up and down is flipped, and so is right and left.  Look at Figure 2.  If the object was the letter F (Today’s blog is brought to you by the letter F) then what appears on the sensor or film is the “lens inverted image.” This is what you see in a large format camera on the ground glass.

Figure 2 - Image inversions in a modern SLR camera. Image may be used under Creative Commons Attribution license.

Figure 2 – Image inversions in a modern SLR camera. Image may be used under Creative Commons Attribution license.

It is also all that you need to make a camera if it is to be purely digital. This is because in a digital camera you can make all the corrections that you need computationally.  You display and store the file with all the corrections made.

The In the next generation of camera, makers decided that this inversion needed to be fixed.  By putting a mirror into the camera at a right angle they could create a “righted mirror image”  where up and down were fixed but right and left were still flipped.  You can do this with a single lens, in which case the lens needed to be flipped out of the way when the picture was taken.  A second approach was the twin lens reflex, which had two identical lens: one for the picture and one for the viewfinder.  This is, of course, a bit costly and also introduces what are called parallax effects as the object gets closer and closer to the image.

To create the right side up image of the modern SLR viewfinder, makers use a pentaprism, which is actually a set of reflective (like a mirror) surfaces that multiply flip the image until it is corrected and do this in a fairly confined space.  For illustrative purposes you can follow the multiple reflections of the blue and red rays in Figure 3 to convince yourself that geometric points wind up where they need to be.  This is shown in Figure 1 and in more detail in Figure 3.  Again with the modern SLR it is necessary to flip the mirror out of the way during the exposure.  This can be done either automatically or manually before exposure if you are afraid of vibrations affecting your image.

Figure 3 - Schematic showing operation of a pentaprism in a modern SLR camera. Image from the Wikipedia created by Paul1513 and in put in the public domain  under creative commons attribution license.

Figure 3 – Schematic showing operation of a pentaprism in a modern SLR camera. Image from the Wikipedia created by Paul1513 and put in the public domain under creative commons attribution license.


Selfie delusions – the quest for good front-facing cameras on cell phones

Figure 1 - IPhone 4S image taken with the low resolution front-facing camera. (c) DE Wolf 2014.

Figure 1 – IPhone 4S image taken with the low resolution front-facing camera. (c) DE Wolf 2014.

Why does the Nokia Lumina cellphone offer a honking 41 mega pixel camera on the back and only a 1.2 megapixel front facing camera.  That’s the one you use for all those important selfies.  Remember that the selfie is the new self-expression medium.  So this is important people.  And why is this what all the cell phone companies do?  Well you’re not going to get an answer.  It has become one of those great rhetorical questions like: what is the meaning of life and why is there air?

Fortunately, New York Times reporter Molly Wood has posted a very entertaining and informative video “Your Best Selfie” to answer the next best question: what cellphone gives you the best selfie?  And since she’s done a nice side by side, apples and apples comparison you can weigh in with your own opinion.  Ms. Wood compares the IPhone 5S with its 1.2 megapixel camera, the Nokia Lumina also 1.2 megapixels the Samsung Galaxy S4 at 2 megapixels, and the HTC One with its 2.1 megapixels.

IMG_0587

Figure 2 – IPhone image taken with higher resolution rear-facing camera. (c) DE Wolf 2014

Ms. Wood correctly points out that it’s not all about the number of megapixels.  This agrees with all that we have said here about image sharpness.  There’s also optics and sensor quality as well as focusing accuracy.  For my mind there’s also the ability of the camera to accurately judge the white balance.  I mean you can do it yourself, but who wants to do that.  I find that warm orange glow of incandescent light kind of soporific and yucky.

Ms. Wood disses the consistency of the IPhone 5S.  I’m not so hard on it.  But her winner for the best selfie sharpness and color is the HTC One, with the Nokia Lumina being the runner up.  Look at the pictures that she shows and I think that you will agree.

I also decided to do a little testing myself.  Figure 1 was taken with my IPhone 4S’s low resolution front-facing camera – not so great.  Figure 2 was taken with the rear-facing 8 megapixel camera – better but still less than I like.  I decided to leave the glare in the pictures.  It’s a common problem with my IPhone.  Yes, it’s due to the overhead lighting, but my Canon T2i would do a much netter job dealing with it.  And ultimately that’s why we sepend big bagels on cameras.  Both of these selfies could use a lot of improvement.  I have not yet tried out the newer versions of the IPhone or other cellphone cameras myself yet.  But Molly Wood does a pretty nice job in her video.

The thing is that a cellphone is becoming much more than a wireless on the go telephone. People use it to surf the web and take pictures.  A selfie photography with the front facing camera is becoming more and more a popular sport.  So the important question, of course, is when will the industry respond to the user.  I mean cellphones are already growing in size suggesting that two points: first that the initial read about the market that smaller and smaller would always be better and second that people just don’t like squinting at their cellphones.  Makes one wonder if we will retro-evolve (retrovolve?) back to the Maxwell Smart shoe-phone size cellphone all the way back to “Hey why don’t we put this baby on the desk?”

Camera optics – lens inversion

Figure 1 - A floating blob of water passes in front of Astronaut Chris Hadfield's face on the International Space Station on January 27, 2014, showing how a lens inverts or roates an image by 90 deg..  Note also the demagnification.  Image from NASA and in the public domain.

Figure 1 – A floating blob of water passes in front of Astronaut Chris Hadfield’s face on the International Space Station on January 27, 2014, showing how a lens inverts or rotates an image by 180 deg.. Note also the demagnification. Image from NASA and in the public domain.

The next camera optical element to consider is the lens.  Figure 1 is an image of Canadian astronaut Chris Hadfield’s floating in the International Space Station on January 27, when a spherical blob of water passes in front of him and acts like a lens.  His image is inverted and demagnified as a result of refraction. Right and left are flipped as we see them, which is to say they are preserved for the inverted image.  It is as if Hadfield’s face was rotated by 180 degrees.

From my point of view this image, posted by Hadfield on Twitter, is both whimsical and genius.  In the spirit of a picture is worth a thousand words, Figure 1 pretty much says it all!

Camera optics – mirror images

MirroredSelfie

Figure 1 – Mirrored selfie, (c) DE Wolf 2014.

I wanted to talk a bit about what I call “camera angles.”  Why do we hold different types of cameras the way we do? And what exactly is going on inside the different types of camera viewfinders. Curiously, what got me interested in this subject is that I was shaving this morning in front of the bathroom mirror and started to play around with self images (selfies) of myself and my mirrored reflection.  One of these experiments is shown in Figure 1. That’s me on the right looking at the camera and alter me on the left looking disdainfully away from the camera.

So much for art and the magic of mirrors mixed with cameras, what about the physics?  OK, look at yourself in the mirror, or flip you cell-phone camera so that you can see yourself on the LED screen.  The person in the mirror is right-side up.  Excellent!  Now raise your right hand.  What does the person in the mirror do? (S)He raises her/his left hand.  Hmm.  So we conclude that mirrors maintain up and down but flip right and left.

Well that is kinda cool!  Now try something else.  Point your finger at the mirror or camera and move it first up, then a bit to the left, then down, and right back to where you started.  You are moving your finger counter-clockwise.  What is the fella in the mirror doing? Let’s see, well first of all (s)he’s moving her/his left hand, first up, then right, then down, then left.  The mirror person sees his/her hand moving clockwise.  Oh my!  So clockwise and counterclockwise are also flipped.

Now here is where I’m going to confuse you, or take you out of the realm of nice little rules.  What I want you to do is keep your mirror as before or your camera still in the back-view (in your face) setting.  But now I want you to tip it at a forty-five degree angle downward towards the floor and look at the image of someone across the room. What you see is that the person is upside down and because right and left haven’t changed they are now correct for the inverted person.

So hopefully you find this is interesting.  If not, I hope you at least liked the selfie.  But significantly because cameras are essentially composed of three types of optical components: mirrors, lenses, and prisms, we have taken an important step towards understanding why they are constructed the way that they are.

Like they say on television: “to be continued.

The age of the drone comes to photography

Figure 1 - A photo drone positioned beside the moon.  Image from the Wikimedia Commons by Don McCullough and put into the public domain under creative commons attribution license.

Figure 1 – A photo drone positioned beside the moon. Image from the Wikimedia Commons by Don McCullough and put into the public domain under creative commons attribution license.

The Christmas holiday this year brought the news that Amazon was experimenting with drone delivery of packages.  While the big issue is bound to be safety to pedestrians, the age of the drone is coming and along with it the real possibility that you will be able to click the little “30 minute delivery” icon with your computer mouse and a half an hour later your package is delivered by one of Amazon’s “Octocopters.”

Some of the implications of this are, well, kind of chilling.  Technical advantage is fleeting and there  are lots of people out there with pretty nefarious motives.  So how this all plays out in terms of governmental control is going to be interesting to say the least.

Still from a amateur, or even professional, photographer’s perspective here is a whole new tool for photography and a whole new perspective on the world as well.  We have all seen the little helicopters being sold at the malls.  They go for about $30 and are good for scaring animals and breaking fragile things around the house.  One of the sights that amused me this past fall as I walked around the mall was a drone hot air balloon in the shape of a shark.  Children gathered on the second floor and giggled gleefully as this misplaced predator was guided from the ground floor tauntingly close to out stretched arms.

But there are some new products out there selling for about the price of a good digital camera that enable you to fly a camera around the neighborhood, hovering over trees, or you neighbor’s swimming pool.  Nude sunbathers beware!  Figure 1 shows a picture of one of these taken by California photographer Don McCullough.  He asked the operator to move it in position with the moon.

For those of you interested in exploring this technology further, a review of the latest version of this technology, the Phantom 2 Vision Photo Drone from DJI can be found in the NY Times.  This retails for about $1200.  The conclusion there is that it’s not a toy, or at least that it’s a toy for big boys and girls.  Also the camera suffers from  wide angle pin cushioning.  But maybe that’s the effect that you’re looking for as you zoom about the landscape.

Seriously though, what we are probably witnessing is the early stages of a whole new perspective for photographers.  You will no longer be limited by where you can carry your camera.  The sky’s the limit!

Accessories for IPhone and Android cameras

Recently I was discussing with a reader whether she could use her IPhone to photograph comet ISON.   This was back in the glory days when comet ISON still had promise.  Well those days appear to be gone, but tonight my wife brought to my attention some very interesting cell phone camera accessories.  So if there were a very bright comet one might just be able to take cool pictures of it with your cellphone.  I need to make two important points: 1. I have not tried any of these gadgets out.  So this is not a product endorsement.  But they are pretty cheap so I may try one or two of them. 2. You almost always get what you pay for; so they are probably crap.  But here goes.

First we have changeable lens for your IPhone or Android.  You can get a 2 x telephoto lens, a macrolens, a polarizer, and a wide angle fisheye lens –  all for around $20 a piece.  Then there is a turret that mounts to your phone; so that with a simple rotation you can select between lenses.  Weep your eyes out Leica owners.  Back in the dinosaur ages this was a coveted M series accessory!  There is also a film copier to digitize slide film onto your camera.  How many people want to do that? At $54 it’s a bit pricey.

Want to turn you smartphone into a microscope for about $25 – no problem.  How about a smartphone telescope?  This too is no problem. And for those of you who already have microscopes or telescopes finding an cell phone adapter is also not a problem.

Mostly we are talking gimmicks, toys, and science fair projects here.  But, the possibilities are definitely endless.  I have a colleague who launched a weather balloon armed with a cellphone.  It took pictures and beamed back its gps location.  Also, and luckily, it didn’t hit anyone on the way down.  Did I mention that the parachute failed to deploy?

I read today that Amazon is planning on delivering packages by drones to your doorstep in about five years.  So of course, David is thinking about two of his favorite blog themes: robotic eyes and the technological singularity.  Technical innovation is driven by cost and the availability of such “toys” for twenty dollars or so opens up a very exciting realm – not to mention a potentially very dangerous one.  Stay tuned.

The Thanksgiving Comet 2013

Figure 1 - From the Bayeux Tapestry (c 1070), the appearance of Halley's Comet in 1066 AD brings fear to the minds of the troops of William the Conquerer.  Image uploaded by Mirabella to the Wikipedia Commons and in the public domain.

Figure 1 – From the Bayeux Tapestry (c 1070), the appearance of Halley’s Comet in 1066 AD brings fear to the hearts and minds of the troops of William the Conqueror. Image uploaded by Mirabella to the Wikipedia Commons and in the public domain.

Well here’s something unusual – a technical blog.  What can I say, I’ve gotten just a bit lazy.  But I do want to point out that on Thanksgiving Day, November 28, 2013 comet ISON is going to whip around the sun, aka reach its perihelion.  If it doesn’t completely vaporize, which is pretty unlikely since this is what comets do, it may produce a truly spectacular show in December and January.  This means, of course, that you are going to want to photograph it, and I am going to tell you how.

First of all, I am going to assume that you do not have a telescope with celestial clock drive.  A celestial clock drive is a computer driven motor that enables you to point your telescope at a sky object, and it will follow the object as the sky moves.  BTW – they worked pretty well in the analogue days before computers – better living through physics.  If you have one of these, you probably don’t need me to tell you how to use it.  Second, this could turn into a pretty big object, in which case a telescope isn’t necessary.  It all depends, and that’s the key.  Nobody really knows what we are in for.  But it is likely that the best shots are going to be taken with a moderate telephoto or zoom lens.  I’m hesitant to conjecture, but maybe 200 to 400 mm.

So here you go:

1. Find a place away from city lights.  That’s the tricky part because these are going to be several second exposures, and you don’t want the background of the sky to outshine the comet.  This also makes just after perihelion a bear of a time to photograph.  At that point comet ISON is going to be in the early morning sky, hovering below the horizon.  Also at these early points, do I have to say this, DON’T LOOK DIRECTLY AT THE SUN.  I have a feeling that the best times are going to be mid-December to early January.

2.Moderate zoom lens

3. Lens wide open aka smallest f-number

4. You need a tripod

5. Image stabilized lens recommended because of wind.

6. Manual focus preferred – despite the fact that the thing is at infinity

7. ISO of at least 800

8. Lock your mirror up to avoid shake

9. Exposure will be several seconds, depending on events again.  This is probably best done with manual shutter speed and bracketing.

This should be all you need to know.  Happy shooting.

Figure 2 - Comet ISON photographed by the robotic eyes of the Hubble Space Telescope on October 9, 2013.  From NASA and in the public domain.

Figure 2 – Comet ISON photographed by the robotic eyes of the Hubble Space Telescope on October 9, 2013. From NASA and in the public domain.